


Guide to Removing Wood Stain
Step 1: Gather your materials and prep the work area.
Before you get started, note that most wood strippers (and even paint strippers designed to handle varnish) contain harsh chemicals that are dangerous to breathe in and should not touch your skin. If possible, work outdoors. If your wood piece is too large to move or you are stripping hardwood floors, make sure windows are open and the room is well ventilated. Lay down a drop cloth to protect the work area (if you are stripping stain from a piece of furniture). Have the paint brush, stripper, and paint scraper, and other tools within reaching distance.
Step 2: Choose your paint stripper.
Although sanding alone can remove some wood stains, in most situations, you will need a chemical paint stripper. Although these products are harsh and even toxic, they could do less damage to a prized antique or vintage piece than the roughness of sandpaper when sanding off stain from wood. The types of paint strippers include:
- Solvents, which are stronger and needed to work through varnish or thick layers or to remove oil-based stains. They can damage delicate wood, so be sure to follow directions carefully for use and safety precautions; these chemical strippers have a high VOC content and come with more health hazards than others.
- Caustic strippers, chemical strippers that are not as strong, and can remove latex- or water-based wood stains (but not polyurethane varnish), though they probably will take longer to work than will solvents.
- Biochemical paint strippers, which are safer than caustic or solvent types because they contain plant-based and organic compounds. They emit lower VOCs, but can still irritate skin and the respiratory system; these strippers are only effective on water-based stains.
- Zero-VOC strippers, which might be the option for DIYers concerned about VOCs and use of common stripper chemicals like methylene chloride. However, they are less effective on wood than on metal or masonry, especially at removing polyurethane layers.
Step 2: Prepare wood for stripping.
Before applying your paint stripper, be sure to prep the piece of furniture by removing any hardware, such as doorknobs, handles, or drawer pulls. Wood strippers or finishers can damage the color of metal hardware on furniture and wood cabinets. Reaching all the stain on a piece might involve taking furniture legs off or otherwise disassembling the item. Set the hardware aside or in a ziplock bag for reassembly later. Wipe down all of the wood surfaces with a microfiber cloth right before applying stripper.
Step 3: Apply paint stripper.
After donning protective gear, pour some chemical stripper into a container. Only use a container that is designed to hold corrosive solvents, such as a disposable aluminum pan or a metal bowl. Pour the stripper into the container carefully so you don’t get any on your clothes or the floor.
Dip the paintbrush in the container of stain stripper and apply a thick layer of the stripper to the wood. Carefully brush it across the surface of the wood until the entire surface is covered. Be sure to keep the layer of stripper even and thick. Gently push the stripper into nooks and crannies to be sure they are covered.


Pro tip:
If the piece of furniture you are working on is large, the best way to remove stain from wood is to strip the stain off a small area, one at a time, instead of stripping the entire piece at once.
Step 4: Let the stripper soak in.
The stripper needs to soak for about 20 minutes. However, it’s best to read the label on your stain stripper for specific timing instructions. Check on it every few minutes for signs of bubbling, which indicates it is working. If you notice any dry areas, apply more stripper and cover it with plastic wrap if necessary to keep it from drying out too quickly.
Step 5: Scrape the stain stripper off the wood.
Use a plastic scraper to scrape the varnish and stain. Start at one edge and gently push the scraper across the surface of the wood in a straight line to match the wood grain. Scrape off the debris (right into a bucket or trash can if possible), and repeat in a different spot. To prevent knicks or damage to the wood, use only a plastic scraper if possible and gentle but consistent pressure, since the stripper softens the wood’s surface. Continue until all the stain stripper has been scraped off.
If an item has a thick varnish layer, this first pass with the stripper might remove only that protective coat and little to no wood stain. Reapply a coat of stripper where needed and follow the same steps above on how to remove wood stain.
Step 6: Scrub the surface to remove small amounts of stain and let the wood dry.

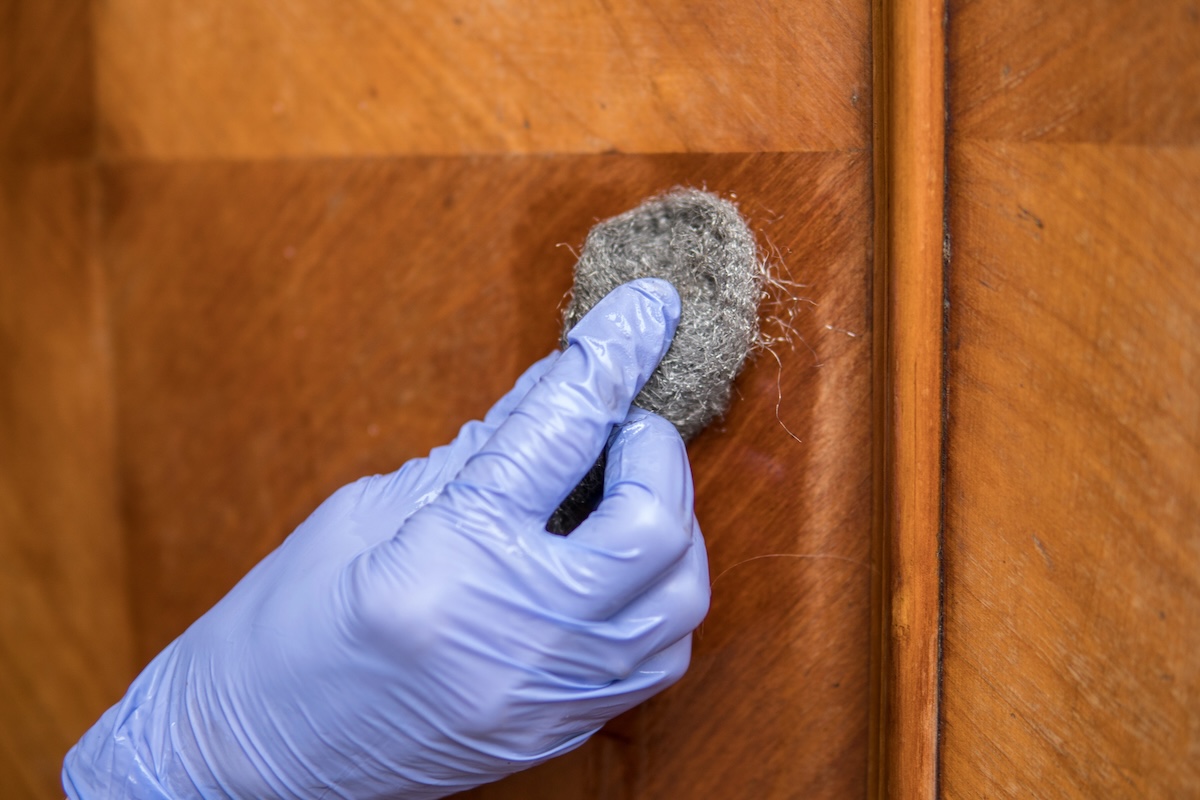
If only small amounts of stain remain, they might come off with final sanding. You can try scrubbing them off with a steel wool pad, wiping in the direction of the wood grain. If necessary, dip the steel wool pad in the stripper before wiping down the surface. Follow the direction of the grain and be sure to get into every nook and cranny.
Once you are satisfied that all the varnish and stain have been removed, wipe down the surface of the wood with a wet rag. Another option is to dampen a cloth with mineral spirits to remove residue from stain and the stripper. Allow the piece of wood to dry for 24 hours.
Step 7: Sand the wood surface.
Once the wood is dry, sand the surface with medium-grit sandpaper. If working on a large area, use an electric hand sander. When sanding wood, always apply steady pressure and sand in the direction of the wood grain. Continue sanding until you remove all traces of the varnish and stain. As you continue to sand, the existing stain will fade away, exposing the raw wood beneath.
Follow up with fine-grit sandpaper to smooth out any scratches made from the coarser sandpaper. Once you are satisfied with the color of the wood, clean the sanding dust from the surface. You can vacuum it off or wipe it well with a dry rag. Wipe again with a damp rag to remove all of the wood dust, using a dab of mineral spirits if desired. Once dry from the damp wipe, the piece of wood is ready for a new stain and protective finish.
FAQs
With most stains and varnish layers, a chemical stripper is the quickest route, saving on labor. However, it also introduces chemicals and fumes into the work area, so it requires the purchase and use of protective equipment like chemical-resistant gloves and even respirator masks. If you must work in an area without ventilation, do not turn to chemical solvents for wood stain removal.
If you are wondering what is the easiest way to remove wood stain, that depends partially on the size and scope of the item and project, and whether it is more important to avoid chemicals or to save time and scraping or scrubbing, in which case you might opt for a more eco-friendly approach.
Some wood stains, such as water-based ones, will come off without using harsh chemical strippers. In those cases, sanding will likely work best. Mineral spirits might remove residual stain or small amounts, but will not be effective on thicker and varnished stains. Any stain that includes polyurethane, lacquer, or oil-based varnish finishes will likely require use of a paint- or wood stain-stripping product.
In some cases, you can skip worrying about how to remove stain from the wood to update a piece; restain dried wood stain surfaces with a gel-based wood stain instead. This type of stain can even sit well over a polyurethane varnish. The new stain must be darker, however. It is a good idea to test a hidden area of wood surface first to be sure you can achieve the look you want without removing the original layer of wood stain.
In general, chemical paint and wood stain strippers with solvents contain harsh and highly odorous chemicals. The worst offender, methylene chloride, is flammable and can cause severe carbon monoxide intoxication and even death if used in an area without ventilation.
The good news is that the Environmental Protection Agency (EPA) banned the toxic solvent as of April 2024. It still could be present in strippers made before that date, so it is essential to read labels and follow all safety precautions listed for any paint stripper, including working outdoors or in a well-ventilated area and use of a respirator mask.
To cut fumes and use of more toxic ingredients, opt for a product with low VOCs, like CitriStrip or BlueBear 605Pro, or a biochemical stripper like SmartStrip. Just beware that these products will likely require more time and labor (including potentially more coats) than a chemical solvent.
You can opt to try a small container of these strippers first, even on a hidden patch of the wood, to see how they work before buying a solvent with a more toxic chemical formula. This could add to the total cost and time of the project, however, if you have to turn to chemical solvents in the end. You also need to carefully read and follow all usage and safety instructions on these products’ labels.
The number of coats and scrapings required to take stain off wood depends heavily on the type (and thickness or layers) of wood stain product and varnish above it, as well as other factors like the stripper formula. It is not uncommon for a DIYer to have to make a second pass of stripper over some areas of wood that resist the first coat of stripper.
Be sure to follow the manufacturer’s instructions for how thick a coat to apply, how long to let the stripper sit on the wood surface before scraping it off, and the recommended number of coats. Usually, using a thick layer works best.
It is possible to remove wood stain without sanding, assuming the chemical stripper and a scraper can remove all of the stain and any finishing layer above it. It might be possible to remove stain with only a carbide scraper (or in combination with a stripper). The tool has a hard and durable carbide blade. But it is best if you have some experience using the scraper to prevent damage to the wood, especially if it is a soft wood. If opting for no sanding, wipe the entire surface down with mineral spirits on a rag to remove any remaining bits of stain or stripper residue before refinishing the wood.


Save Energy While Staying Cozy